A fecal exam is the preparation and inspection of fecal matter for organisms, and parasites. Many goat breeders run their own fecal exams on their herd to confirm the presence of parasites and select the proper treatment for the organism. There are many advantages to procuring a microscope and the supplies to conduct this simple test. The first is concerning cost. A fecal exam at a veterinarian or other laboratory can cost anywhere from $7-$15 per sample. If you have a very small herd, it might make sense to use an outside source to run the test, however, as herd size increases, it might make more sense to buy a microscope and run your own fecal exams on your herd. A good microscope and supplies for running fecal exams can cost several hundred dollars, but when compared to what a breeder would spend in lab fees to examine the entire herd, the upfront cost is recovered quite quickly. The second advantage to running your own fecal exams is in regards to time. Different laboratories vary in the time it takes to receive results but generally, if you send a sample in for examination the turn around time is overnight. Conducting your own fecal examinations allows you to obtain instant results (after prep time) and allows the freedom for you to retest as often as you would like. Once your initial investment is satisfied, the only consumable material for the testing is the salt solution, which can be restocked at home for pennies. (Epsom Salt + Water)
The kit we bought for our farm was obtained from maggidans.com http://www.maggidans.com/kte.htm
The Deluxe microscope has a mechanical stage so that you do not have to move the slide in order to examine it. It also has a rechargeable light. This kit also comes with supplies to run several other advanced tests, and a handy guide to identifying different types of organisms and eggs. I highly recommend this kit, which is priced at $184.95.
In this tutorial, we will discuss the process for preparing and examining a simple fecal sample using the Deluxe kit from Maggidans. I will also be discussing other ways to prepare samples for examinations using other supplies. Let's get started!
First, let's discuss collection of the sample.
The most efficient way to collect a "clean" sample is to go in and get it. This method ensures that the sample is not contaminated by outside factors. I use a surgical glove and some lube or soapy water for lubrication. Insert a gloved and lubed finger into the anus of the goat and pull out a couple of berries. Don't worry, this is not an exploratory mission. The berries will be right there and you do not have to go look for them. You only need two or three berries for a good sample. I put the sample directly into a plastic bag that has been labeled with the goat's name.
Tip: When collecting a sample, I always have the bag ready for collection first before getting the goat. Once you put the goat on the stanchion, wait a few minutes before "going in." In my experience, the goat will usually eliminate before you have to go in and retrieve. It's especially effective if you sweep (and mop!) the area under the stanchion first, because we all know that goats just LOVE to dirty a clean floor. HA! If this happens, simply open the baggie and let some poo drop into it.
Next, let's discuss supplies.
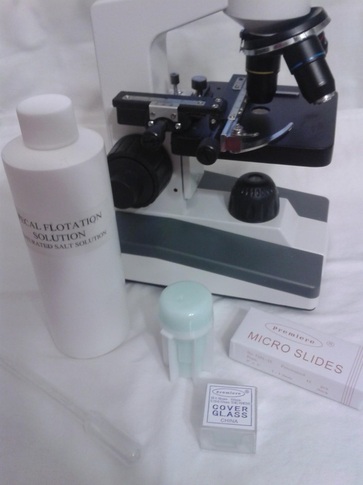
Clockwise from top: Microscope, Slides, Cover slips, Fecalyzer Container, Eye Dropper, Concentrated Saline Fecal Solution.
You will need the fecal sample, a microscope, an eye dropper, a slide, a cover glass, some fecal flotation solution (saturated salt solution) and a prep chamber. The Maggidan's kit comes with a little container (the fecalyzer) that makes it easy to prepare the sample, but there are other things you can use to prepare it, for example, a plastic souffle cup, a popsicle stick, and a test tube or similar thin tube-like container. The "fecalyzer" container basically does two things. One, it breaks up the sample and stirs the salt solution into it to liquify the feces. Two, it creates a surface to apply a coverslip and collect any eggs from the sample.
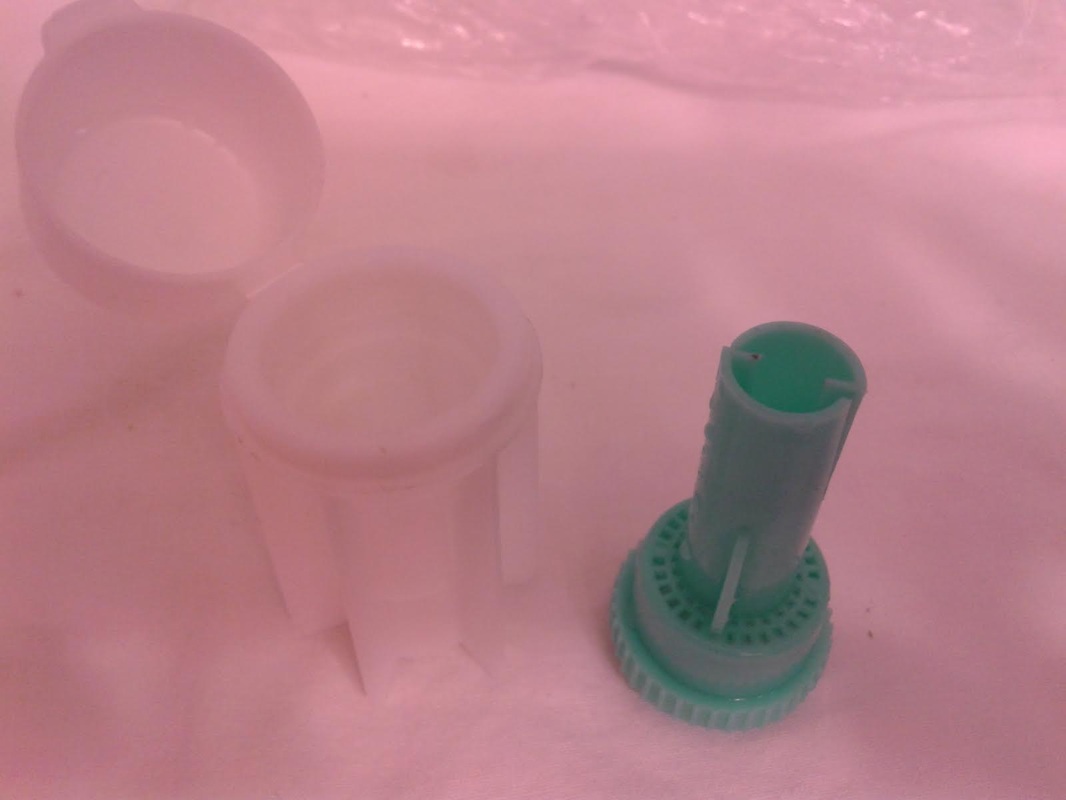
The fecalyzer consists of a plastic lidded container, and the green insert, which both contains and breaks up the sample.
Method:
1. The first thing you need to do is to break up the feces in the bag. Use your fingers to tear up the berries through the bag, and break them into smaller pieces.This makes the liquification process easier.
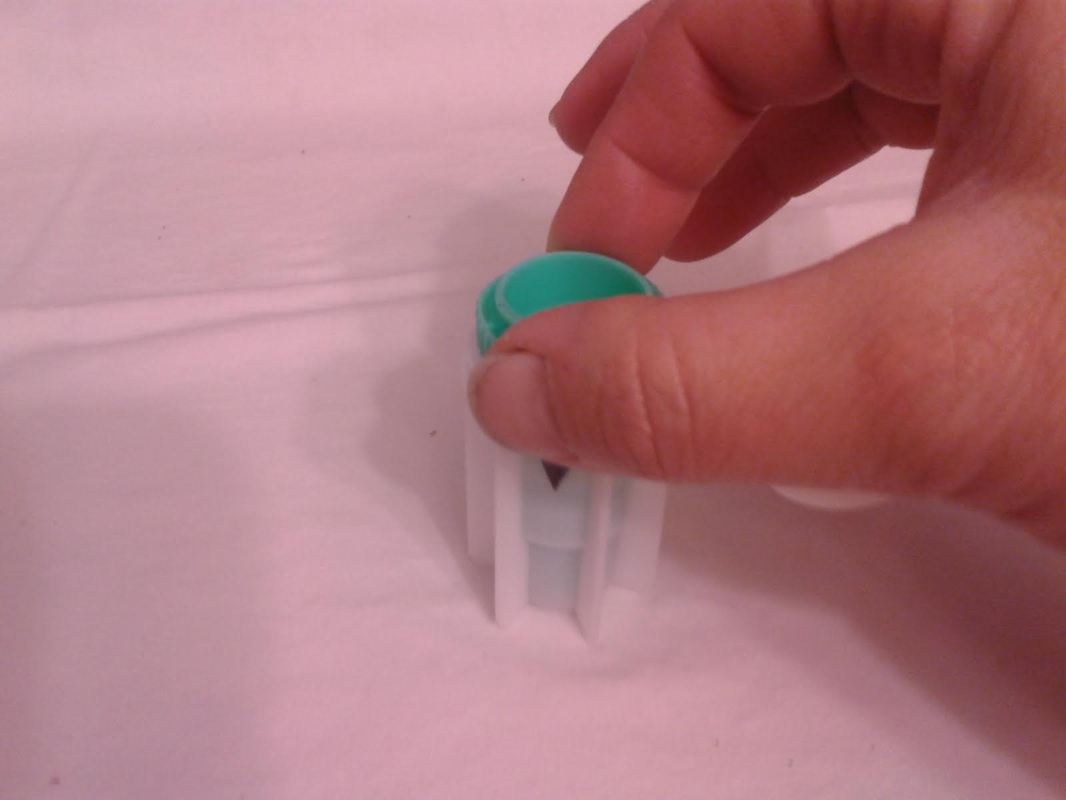
2. Insert the green insert of the fecalyzer into the plastic bag and collect some feces in the small end of the fecalyzer insert. Do not pack the feces into it as that is counterproductive. The goat is to break up and liquify the feces, so keep it loose within the collection chamber.
1. The first thing you need to do is to break up the feces in the bag. Use your fingers to tear up the berries through the bag, and break them into smaller pieces.This makes the liquification process easier.
2. Insert the green insert of the fecalyzer into the plastic bag and collect some feces in the small end of the fecalyzer insert. Do not pack the feces into it as that is counterproductive. The goat is to break up and liquify the feces, so keep it loose within the collection chamber.
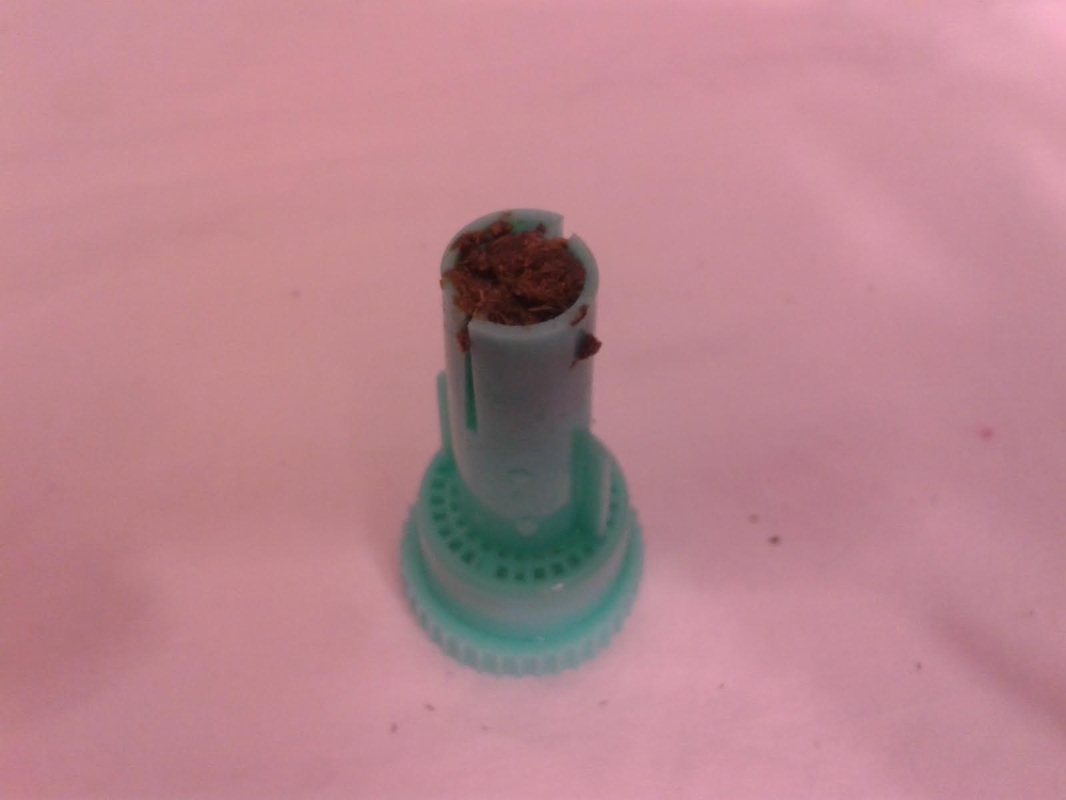
Fecalyzer insert with sample.
**If you do not have a fecalyzer, it is at this point when you can break up the feces and put it into a plastic souffle cup.
3. Place the green insert back into the fecalyzer container with the sample to the bottom of the container. Add two droppers full of the fecal floatation solution to the container to start to dissolve and stir the sample. The fecalyzer has an arrow on the side of the container. This is the initial fill level of the container.
3. Place the green insert back into the fecalyzer container with the sample to the bottom of the container. Add two droppers full of the fecal floatation solution to the container to start to dissolve and stir the sample. The fecalyzer has an arrow on the side of the container. This is the initial fill level of the container.
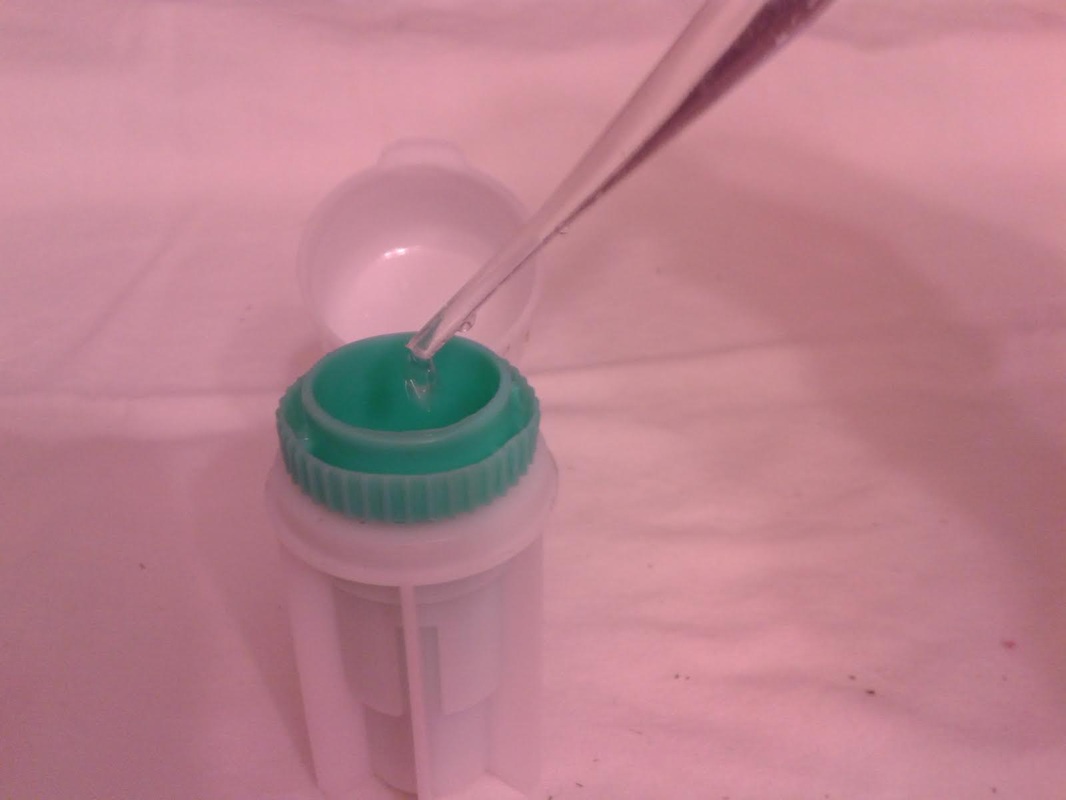
Add saline solution to the sample.
**If you do not have a fecalyzer, it is at this point when you should add the floatation solution to the souffle cup and stir and mash the feces with a popsicle stick or other utensil to liquify it.
4. Seat the green insert back into the fecalyzer. Twist the green insert back and forth in the fecalyzer to stir and break up the sample. The insert has a stop in the end, so it will only turn 180 degrees in each direction. Let the sample sit for five minutes after twisting and then twist again to ensure it is mixed well. If you carefully lift the basket, your sample should look like muddy water. You may also see some solid plant material floating on top. The fecalyzer has a strainer basket on it that keeps some materials from rising to the top , so if you are not using the fecalyzer, you can use some cheesecloth or a tea strainer to strain the debris out of the sample before examination. Some debris in the final sample is to be expected.
4. Seat the green insert back into the fecalyzer. Twist the green insert back and forth in the fecalyzer to stir and break up the sample. The insert has a stop in the end, so it will only turn 180 degrees in each direction. Let the sample sit for five minutes after twisting and then twist again to ensure it is mixed well. If you carefully lift the basket, your sample should look like muddy water. You may also see some solid plant material floating on top. The fecalyzer has a strainer basket on it that keeps some materials from rising to the top , so if you are not using the fecalyzer, you can use some cheesecloth or a tea strainer to strain the debris out of the sample before examination. Some debris in the final sample is to be expected.
5. After the sample is mixed well, and appropriately liquified, it is now time to transfer the sample and prepare it for examination.
With your eye dropper, add enough saline solution to create a meniscus (a bulge of water that extends up over the edge of the container). Be careful not to overflow the sample, but make sure you have enough so that it creates a convex surface for the slide cover to rest on.
With your eye dropper, add enough saline solution to create a meniscus (a bulge of water that extends up over the edge of the container). Be careful not to overflow the sample, but make sure you have enough so that it creates a convex surface for the slide cover to rest on.
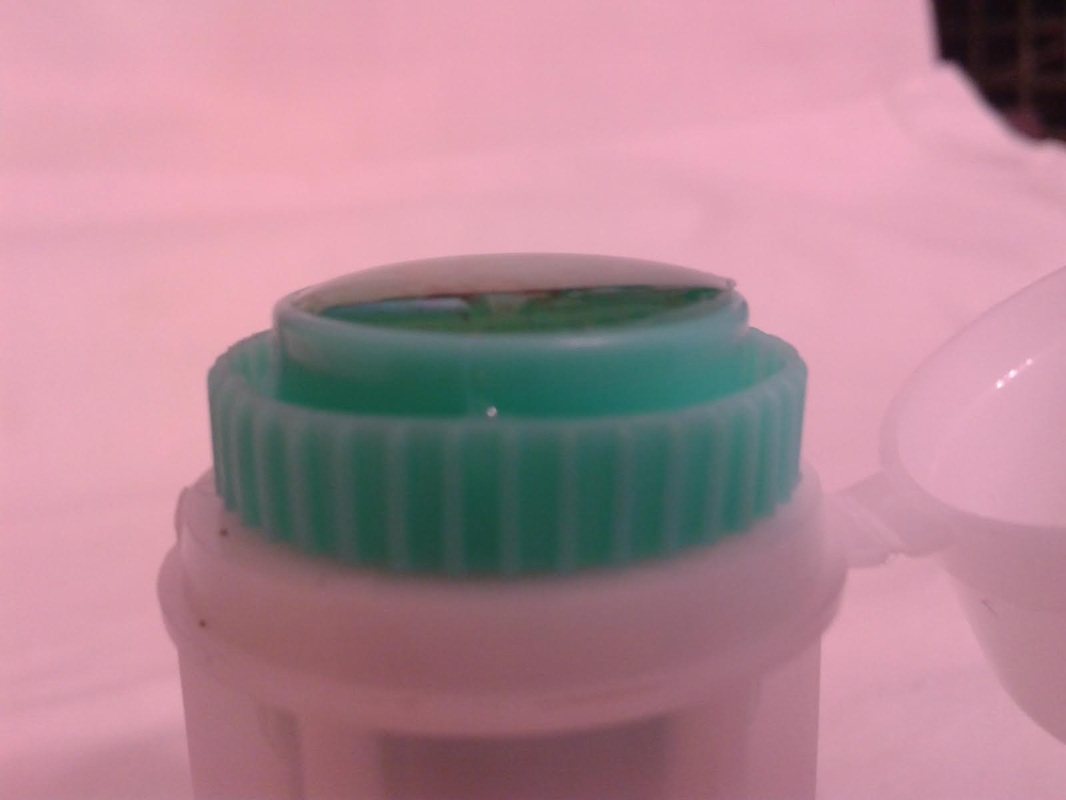
Meniscus
Once you have a meniscus, carefully place a slide cover glass on top of it. Letting the sample sit will allow parasites eggs (which are lighter than the saline solution) to float to the top. The eggs will rise to the top over the next 15-20 minutes and will get stuck on the glass. This will become your sample for examination.
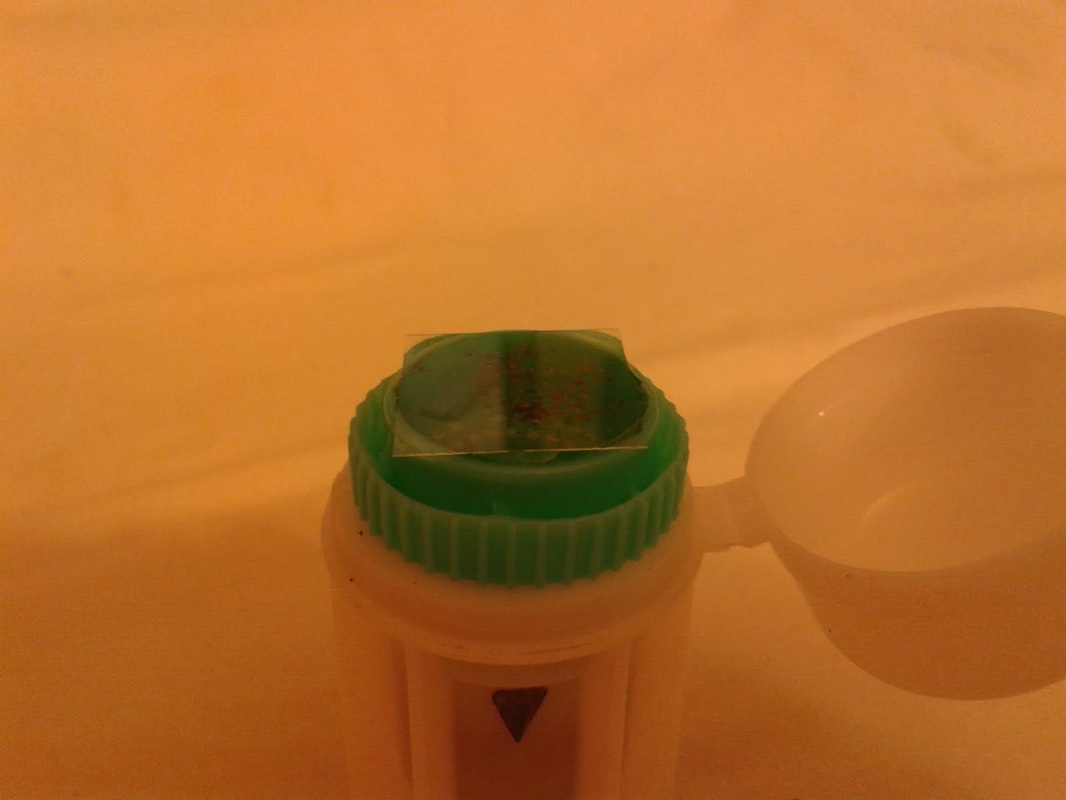
Place slide cover glass on meniscus and wait 15-20 minutes.
** The fecalyzer is the perfect size for collecting the eggs onto a slide cover as the lip of the basket is just smaller than the cover glass. If you do not have a fecalyzer, use a test tube instead. Create the meniscus over the lip of the test tube, and float the cover glass on the meniscus.
6. After 15-20 minutes, you are now ready to transfer your sample to the slide. Lift straight up as not to disturb any eggs which have collected, and place it wet side down onto a slide.
6. After 15-20 minutes, you are now ready to transfer your sample to the slide. Lift straight up as not to disturb any eggs which have collected, and place it wet side down onto a slide.
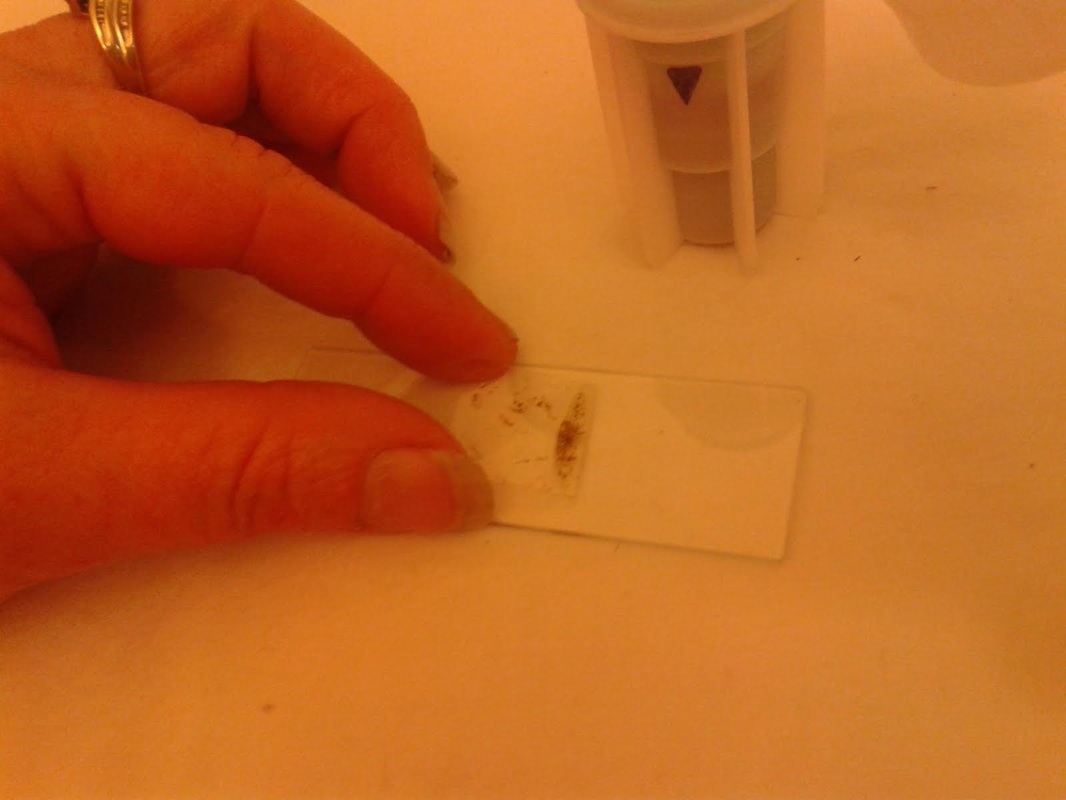
Place the cover class on the slide, wet side down.
Give the cover a little tap with your finger, and the liquid should spread out between the slide and the cover. As I said before, some plant matter and debris is to be expected. The amount of debris present could make the cover unable to seat to the slide. To fix this, take a little of the top most fluid in the sample and deposit a drop of two at the side of the cover glass. This will create enough liquid to seat the cover to the slide.
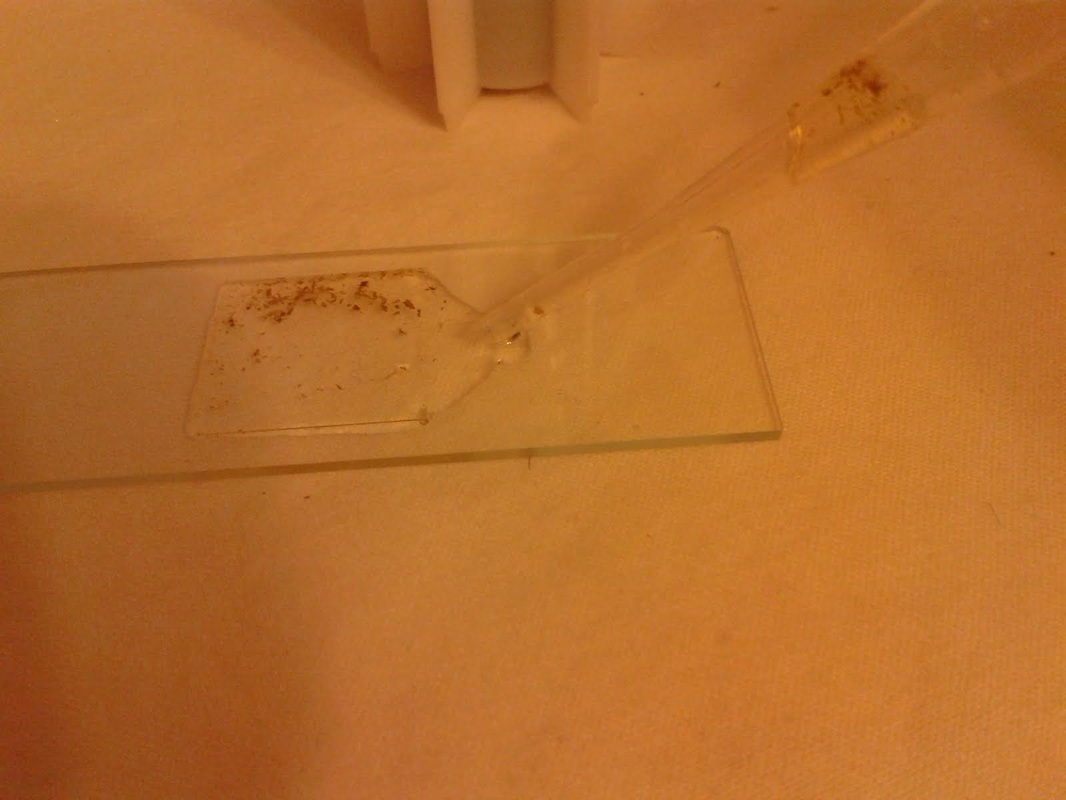
Some samples may need more liquid. Use the eyedropper to collect the top-most sample to seat the cover slip.
7. Now you are ready to examine the sample for parasite eggs. Carefully move the slide and place on the stage of the microscope. You should use the 10X lens for your initial examination. On the Deluxe microscope from Maggidans, that is the yellow striped lens. Make sure you have ample light coming through the diaphragm below the stage. To adjust the light level you can turn the dial on the base of the microscope (more light is needed for higher magnification).

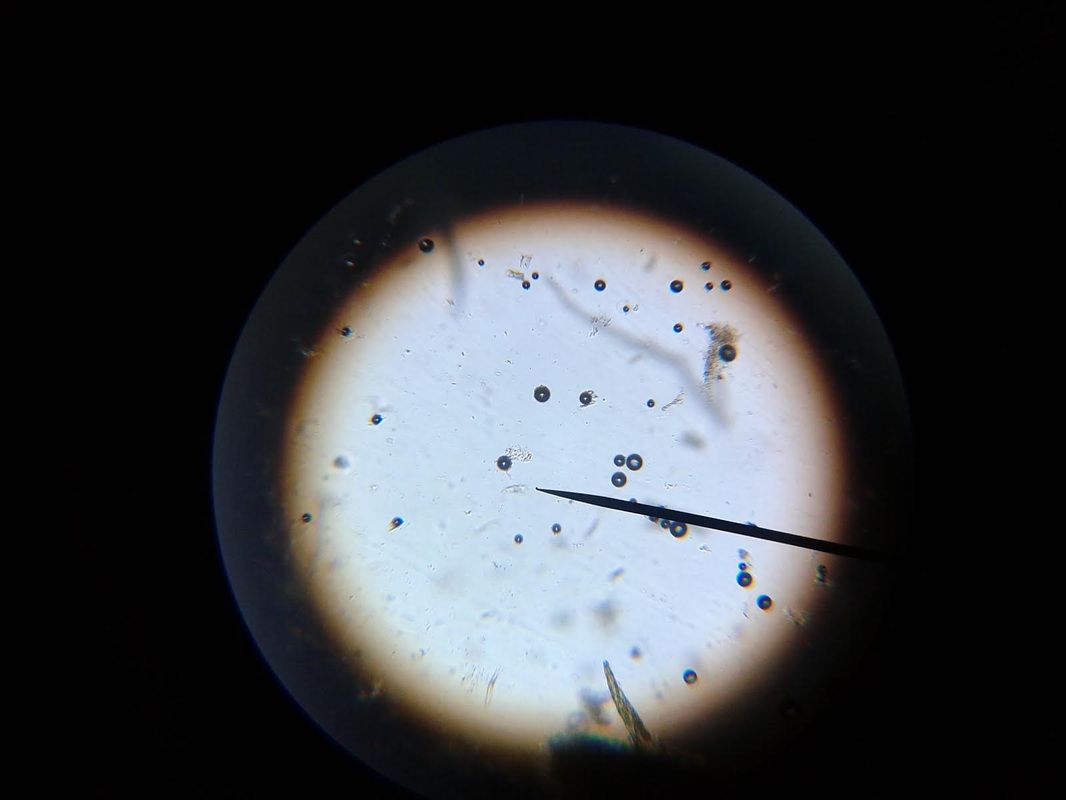
8. Next you want to focus the lens. Below you will see the proper focus for the examination of the sample. You will surely see many small perfectly round air bubbles in the sample. Do not mistake them for eggs. If the object is perfectly round, it's air. Parasite eggs are oval. This is the level you want to focus on (the area right under the cover glass), so adjust the focus so that you can see a black circle around the air bubble with a clear space in the middle as shown below.
9. I always start my examination by locating the lens at the upper right corner of the cover slide. You can easily see the edge of the cover glass through the microscope to start your exam. There are two small knobs on the Deluxe microsope. One moves the stage up and down, and the other moves it left to right. It takes some practice to master this process, since it works like an etch-a-sketch, and everything is backwards when viewed through the scope. Sweep the entire sample working up and down and from right to left. Try to overlap your passes through the exam so that you don't miss anything.
You will see many interesting things in the sample. There will be alot of plant matter (hay), air bubbles, curly looking fibers (also hay), and perhaps some salt crystals (which have edges and are angular). If your sample starts to dry during exam, you might see some very long thin looking salt crystals, that grow like frost. If it inhibits the view too much, start another sample. If you think you might see a parasite egg, but you are not sure, switch to a higher magnification (40X) and let in more light on the dial and try to focus on the nucleus of the egg. There are many different kinds of parasite eggs that you might find, but the most common and greatest threat will be coccidia and Haemonchus contortus (Barberpole). Coccidia is a protozoa that can affect any animal, and the first symptom is usually diarrhea (sometimes bloody.) Coccidia must be treated promptly or it can cause death.
You will see many interesting things in the sample. There will be alot of plant matter (hay), air bubbles, curly looking fibers (also hay), and perhaps some salt crystals (which have edges and are angular). If your sample starts to dry during exam, you might see some very long thin looking salt crystals, that grow like frost. If it inhibits the view too much, start another sample. If you think you might see a parasite egg, but you are not sure, switch to a higher magnification (40X) and let in more light on the dial and try to focus on the nucleus of the egg. There are many different kinds of parasite eggs that you might find, but the most common and greatest threat will be coccidia and Haemonchus contortus (Barberpole). Coccidia is a protozoa that can affect any animal, and the first symptom is usually diarrhea (sometimes bloody.) Coccidia must be treated promptly or it can cause death.
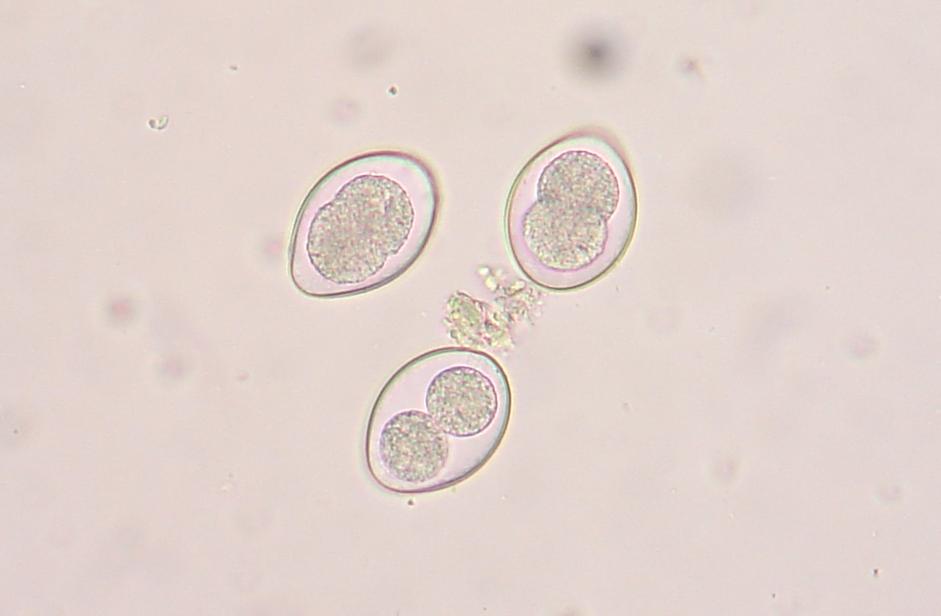
Coccidia
Many breeders (us included) have been battling the barberpole worm (Haemonchus contortus) in our herds. This worm is resistant to most ordinary parasite treatments, and must be tackled with a specific regimen to eradicate it. Chances are...if you find an egg, it's probably the barperpole. Barberpole worms are blood sucking stomach parasites that can cause edema and death if not properly treated. Your best chance to identify and fight the barberpole is by managing your herd using FAMACHA testing (FAMACHA tutorial coming soon!), rotational pasture management, switching types of dewormers, and conducting fecal exams when parasitism is suspected.
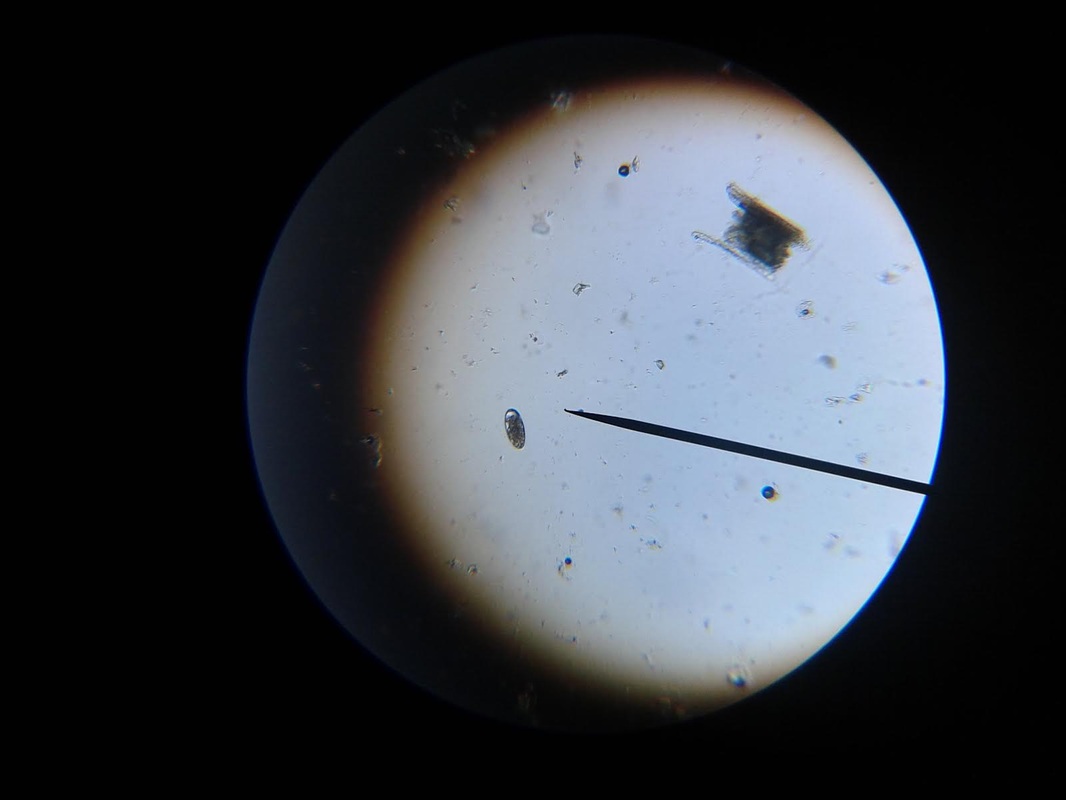
Haemonchus contortus 10X
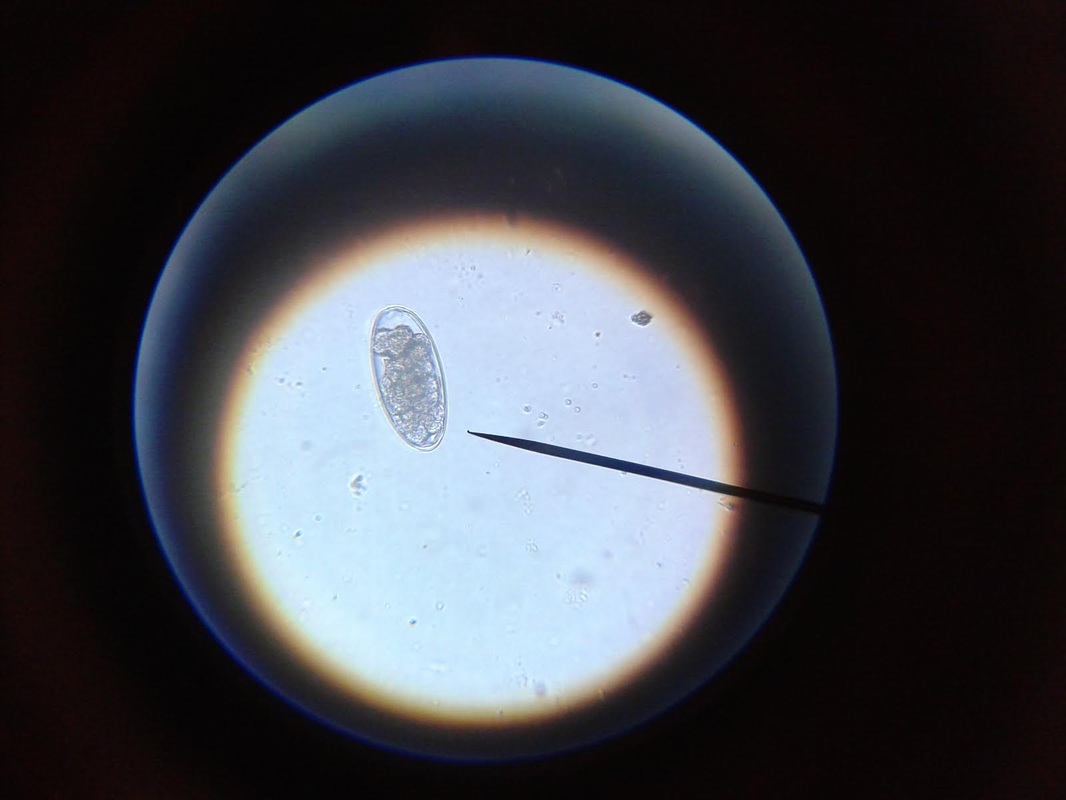
Haemonchus contortus 40X
The treatment for the Haemonchus contortus varies by animal, and as I am not a veterinarian, I will not discuss or endorse the specific treatment of it here. However, I am always here to help in any way I possibly can, and I am always willing to recommend suggestions for seeking further information. If you have a question regarding the care or treatment of your herd, please feel free to contact me.
I hope you enjoyed this tutorial, and I hope that you learned something from it. I will be adding the tutorial on FAMACHA testing very soon. Stay tuned!
I hope you enjoyed this tutorial, and I hope that you learned something from it. I will be adding the tutorial on FAMACHA testing very soon. Stay tuned!


 RSS Feed